Brief Summary
This course teaches you how to create amazing options menus for iOS 7, whether you're working on games or apps. You'll dive into designing various UI elements like UISwitches and UIPickerViews, making your project visually engaging and interactive.
Key Points
-
Create stunning option menus for any iOS 7 projects.
-
Focus on UISwitches, UIButtons, UISliders, and more.
-
Learn to build a 3-column UIPickerView using Property Lists.
-
Interconnect picker views for dynamic selections.
-
Utilize a singleton AppData class for preference management.
Learning Outcomes
-
Build fully functional option menus for your projects.
-
Understand how to integrate different UI elements.
-
Manage data effectively using Property Lists.
-
Create interactive UIPickerViews that respond to user choices.
-
Implement a singleton pattern for easy preference access.
About This Course
Learn how to make incredible looking Option menus for any iOS 7 project. Games or App, Sprite Kit or UIView-based.
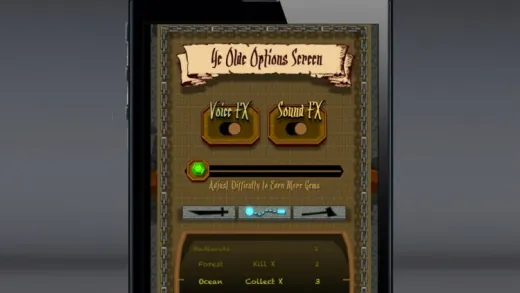
In this tutorial, we will focus entirely on creating an Options or Preferences screen, using a Single View Application (or UIView based project) or Sprite Kit based project. We'll create UISwitches, UIButtons, UISliders, UISegmentedControls (and groups of buttons that act like segmented controls), and finally, a UIPickerView. Picker views can be made up of single or multiple columns of "spin-able" data (for example, Apple's Clock app has a Timer function made up of a double column UIPickerView).
In our hypothetical project we will create a 3-column picker view which populates itself using data from a Property List file. This data is split into a column for the level name ("Ocean, Bad Lands, etc"), a column for the mode of game play ("Kill X" number of enemies, "Collect X" number of coins, or "Beat the Clock") and third column for a number parameter to tweak the difficulty of each game mode (for example, you could add more time to the "Beat the Clock" mode or add more enemies to kill). We will make the wheels interconnected as well. So if you spin the first wheel to set the level, it will change the other two wheels to default to the settings defined in the Property List for the level. If you spin the middle wheel to change the game mode, it will automatically change the third wheel to use a different range of numbers (one mode of play might be best with a small range like 1-15, but another might work better in increments of ten, like 60-300).
All of our data is stored in a singleton AppData class, which serves as a go-between to use (or test) our preference variables with any other class. You'll see how to test any changes made in the OptionScreen class with the main game / app class.
The source projects are saved in increments throughout the tutorial series, and uploaded in the Supplemental Materials tab at notable breakpoints. You'll get both UIView and Sprite Kit based projects. The images to use are included as well.


Steve Y.
Really informative course. Would be nice to see an updated version in swift.